Installing solar panels is not just a matter of fastening modules to a roof. The roof must support the system, receive useful sunlight, and allow safe access for installation and maintenance. A shaded chimney, aging shingles, or a narrow attic access hatch can change the plan before any equipment reaches the roof.
This guide explains how to install solar panels on roof surfaces, from checking roof condition and measuring usable space to planning mounts, wiring, and system inspections. Solar installation expert and NABCEP-certified professional Sean White emphasizes a practical principle: “Plan the system around the roof, not the other way around.” That advice matters when rafters do not align with the proposed mounting points or afternoon shade falls across a row of panels.
Small details count. A loose flashing edge can invite water; a poorly placed conduit can complicate later repairs. The work also involves electrical hazards and roof-fall risks, so readers should know when to stop and bring in qualified professionals. Not every roof is a good solar roof. That can be frustrating, but it is better to find out before drilling. The sections ahead offer a clear, safety-minded path for assessing the project, choosing suitable components, and understanding the installation steps—without treating a complex job as a simple weekend task.
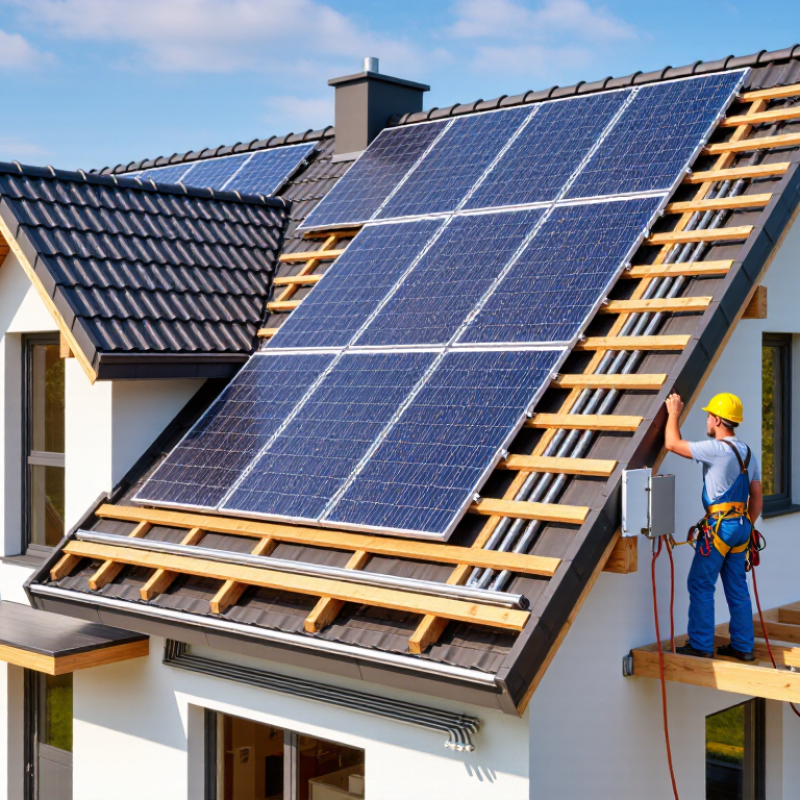
Installing solar panels on a roof requires more than placing modules under the sun. A rooftop solar system includes panels, mounting rails, an inverter, wiring, and safety disconnects. Some homes also need batteries. Before installation, inspect the roof’s age, material, slope, and load capacity. A roof with cracked tiles or weak rafters should be repaired first. This detail is easy to overlook.
Sun exposure matters every hour. Check shade from chimneys, trees, nearby buildings, and roof equipment. A clear roof surface usually produces more reliable energy. Orientation and tilt also affect annual output, although local climate changes the ideal arrangement. Solar access should be measured, not guessed. Even a small afternoon shadow can reduce production.
Electrical requirements need careful attention. The home’s service panel must accept the proposed system, and all cables need suitable protection against moisture and heat. Local authorities may require structural drawings, electrical plans, permits, inspections, and grid-connection approval. Fire-access pathways must remain clear. A qualified installer should verify these details and explain how the system will be shut down during emergencies. Weather sealing around roof penetrations is critical; one poorly sealed fastener can create an expensive leak. The plan may look complete on paper, but actual roof conditions can force changes. Regular monitoring and occasional inspections help identify loose connections, damaged wiring, or falling production before small problems become serious.

Before planning an array, inspect the roof from the attic and outside. Look for damp sheathing, cracked shingles, sagging rafters, and loose flashing around vents. A driveway photo can miss soft spots beneath the roofing. If replacement is likely within a few years, coordinate it before installation; removing panels later adds cost and disruption. Small details matter. Ask a qualified roofer to assess structure and remaining roof life, especially after leaks or repairs.
Sunlight varies across the roof, even on clear days. A chimney’s narrow winter shadow can reduce output more than its summer shadow suggests. Note nearby trees, roof direction, pitch, and shading at different hours, then compare them with a site-specific production estimate. The National Renewable Energy Laboratory’s PVWatts Calculator applies a default 14% system-loss assumption, illustrating why panel nameplate capacity is not the same as usable energy. Actual losses depend on site and equipment. That estimate is useful, but it is not a promise.
Check electrical capacity before choosing system size. An electrician should inspect the service panel, breaker space, wiring condition, and proposed connection point; a crowded panel may need changes. Also compare expected solar output with household use, including seasonal peaks. I would not call a roof “ready” from one inspection alone. Conditions can be missed, and estimates can be imperfect. Keep the assessment, shading notes, and electrical findings together before requesting final designs.
Plan around your household’s actual electricity use, not a sales estimate.
The U.S. Energy Information Administration’s 2022 electricity data show average residential consumption near 10,800 kWh per year. Your bills may differ sharply. Check twelve months of bills, then compare usage with roof orientation, shading, and available area. Berkeley Lab’s Tracking the Sun 2024 report analyzed more than 3.7 million U.S. solar systems, documenting wide variation in system size and installed prices. Use local quotes as comparisons, not guarantees. A roof replacement soon can change the project budget.
Before ordering equipment, ask your local building department which drawings, structural details, and electrical plans it requires. Confirm fire-access clearances and utility interconnection steps with the relevant authorities. Permit rules vary by location, and approval can take longer when documents are incomplete.
A qualified installer or structural professional can assess rafters and roof condition. I would not treat an online roof estimate as proof of structural capacity; that shortcut feels convenient, but it leaves an important question unanswered.
Tips:
Secure roof mounts to structural rafters, not just the surface sheathing. Check the roof’s condition and layout before drilling; a small measuring error can shift an entire panel row. Use suitable flashing and approved fasteners to help prevent leaks. Mount spacing depends on the roof structure and the panel system, so follow the project specifications. Keep a safe working area, and stop if the roof is wet or wind picks up.
Tips: Mark each rafter and mount location, then recheck the measurements. Leave clear access around vents and roof edges. I once assumed two rafters were evenly spaced; they were not. Rechecking takes time, but repairing misplaced holes takes longer.
Lift panels with help, set them onto the rails, and tighten clamps to the specified torque. Avoid leaning on the glass or pinching cables beneath the frame. Electrical work requires careful planning: isolate the system, use correctly rated components, and protect wiring from sharp edges and standing water. Have a qualified solar electrician verify connections, grounding, and system testing. A neat cable run matters. Still, tidy wiring alone cannot confirm a safe installation.
2026 Top Guide: How to Install Solar Panels on Roof?
Inspecting, Connecting, and Activating the Solar System
Before connecting a rooftop array, inspect every module, rail, and cable. Look for cracked glass, loose fasteners, pinched insulation, and debris beneath the panels. A cable rubbing against a sharp roof edge can become a fault later. Small details matter. Confirm the inverter and protective devices match the system design, and have a qualified professional verify electrical connections before energizing the system.
During commissioning, check polarity, grounding, string voltage, and insulation resistance using equipment suited to the installation. Compare readings with the design documents and inverter specifications; unexplained differences deserve investigation, not guesswork. The National Renewable Energy Laboratory’s Best Practices for Operation and Maintenance of Photovoltaic and Energy Storage Systems recommends documented commissioning and ongoing system checks. Keep test results, equipment settings, and dated photographs together. You may miss something. A second inspection helps.
After activation, confirm the inverter starts normally and each string reports expected output under comparable sunlight conditions. Check the monitoring portal for warnings, but do not treat a green status icon as proof that every panel performs well. A review by Jordan and Kurtz in Progress in Photovoltaics reported a median photovoltaic module degradation rate of about 0.5% per year across reviewed studies. That is a fleet-level finding, not a promise for one roof. Record early production readings; they create a useful baseline for spotting later changes.